Giving a New Purpose to an Old Phone — Installing LineageOS 18.1 on the Moto G5
Why?
With the passing of the years, we feel the need to keep ourselves updated when it comes to bleeding-edge technology — whatever the reasons may be: security, constant updates, fear of missing out, etc.
However, it is important to remember that what we used before, back in the good old days, is not totally useless. We can give it a new reason to exist. Even though it may not be the smooth experience you are used to, it is still worth it.
And that reason? Reducing e-waste.
So, enough small talk — today I’m going to show you how to install LineageOS on this old Motorola device and also root it.
You might be wondering: why would we even do this?
An old device with a new purpose can be quite handy, especially if you don’t want to risk bricking your daily driver. Here are some ideas of what you can do with it:
- Privacy-focused phone — disclaimer: this is an older version of LineageOS; if privacy is your main concern, I’d recommend using a currently supported device. Any information disclosure or security vulnerability is not my responsibility — use at your own risk.
- Portable pentesting device — tools like Nmap, Metasploit, and Aircrack run fine via Kali NetHunter, though don’t expect the same performance as a modern device or computer.
- OSINT research — a device that doesn’t trace back to your real identity.
- SDR and RF research.
- Secondary or backup device.
- The list goes on — you decide what to do with it.
Also worth mentioning: even though this is an older version of LineageOS, this guide may still be useful if you’re lost when it comes to rooting a device and are not yet familiar with ADB and fastboot.
Enough talking — let’s get to business.
This is a complete step-by-step guide on how to install LineageOS 18.1 on the Motorola Moto G5 (codename: cedric, model XT1672). It was written based on a real installation experience, including every error encountered along the way and how to fix them.
I will provide the files on my GitHub repository, along with links to the original sources where I obtained them.
Also note: I used Linux throughout the entire process — some commands may differ on other operating systems.
Prerequisites
- A Linux PC
- A USB data cable
adbandfastbootinstalled on your PC- A Moto G5 with enough battery (at least 50%)
Install android-tools on Linux
ou will need it to get the ADB and fastboot binaries:
1
sudo pacman -S android-tools
Important Notes Before You Start
- Your model number matters. This guide is for the XT1672 (Brazilian retail). Check yours at
Settings > About Phone. - Unlocking the bootloader will wipe all data on the phone. Back everything up first.
- The Moto G5 officially received Android 7.0/7.1. Motorola never released an official Android 8.1 OTA for it — but LineageOS 18.1 requires 8.1 firmware. We’ll handle this.
1) Back Up Your Data
Always remember of backing up your data
1
adb pull /sdcard/ ~/moto-g5-backup/
2) Enable Developer Options and OEM Unlocking
On the phone:
- Go to
Settings > About Phone - Tap Build Number 7 times until you see “You are now a developer”
- Go back to
Settings > System > Developer Options - Enable USB Debugging
- Enable OEM Unlocking
3) Get the Bootloader Unlock Code from Motorola
Unlike other phones, like Google Pixel, the Moto G5 requires an official unlock code from Motorola.
Boot into fastboot:
1
2
adb reboot bootloader
fastboot devices  # confirm phone is detected
Get your unlock data:
1
fastboot oem get_unlock_data
This returns 4 lines. Concatenate them into one string keeping the # separators
Then:
- Go to Motorola’s bootloader unlock page
- Sign in or create a Motorola account
- Enter your IMEI (visible in
fastboot getvar alloutput) - Paste the concatenated unlock data string
- Accept the terms and submit
- Check your email — Motorola will send you the unlock code
4) Unlock the Bootloader
Once you receive the unlock code by email:
1
fastboot oem unlock YOUR_UNLOCK_CODE_HERE
The phone will wipe itself and reboot. After it reboots, re-enable USB Debugging in Developer Options.
Verify the unlock:
1
2
fastboot getvar securestate
# Should say: oem_unlocked
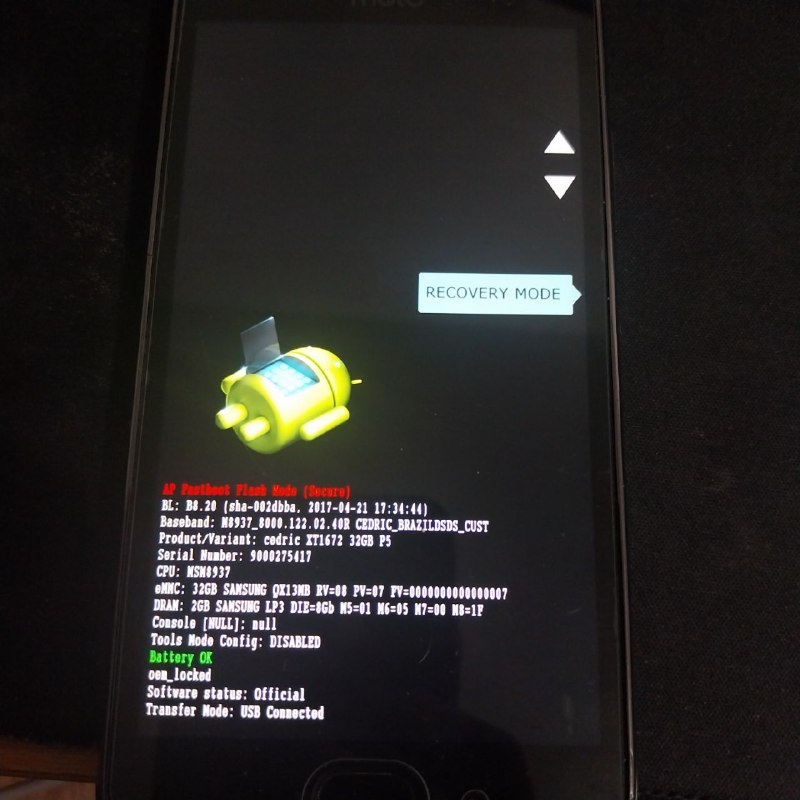
5) Flash TWRP Recovery
Download TWRP 3.5.2 for cedric from dl.twrp.me/cedric.
Note: On unlocked Motorola devices, “Image not signed or corrupt” is the normal success message when flashing recovery. Don’t be alarmed.
1
2
adb reboot bootloader
fastboot flash recovery twrp-3.5.2_9-0-cedric.img
Boot into TWRP by holding Volume Down + Power, then selecting Recovery with the volume keys.
6) Flash Stock Android 8.1 Firmware
LineageOS 18.1 requires Android 8.1 stock firmware. If you’re on Android 7, you must upgrade first.
Download the stock 8.1 firmware for XT1672 from stockrom.net (Google Drive link, no account needed).
The downloaded zip contains .img files — this is a fastboot flash package, not a TWRP zip. Flash it via fastboot:
1
2
cd ~/Downloads/g5/  # folder with extracted firmware files
adb reboot bootloader
Once inside the directory containing the extracted firmware files, reboot the device into fastboot mode to begin flashing the partitions.
1
2
3
4
5
6
7
8
9
10
11

fastboot flash bootloader bootloader.img
fastboot reboot-bootloader

fastboot flash modem NON-HLOS.bin
fastboot reboot-bootloader

fastboot flash boot boot.img
fastboot flash oem oem.img
fastboot flash logo logo.bin
We then flash the bootloader partition, followed by a reboot to ensure the changes take effect. This same process — flash, then reboot — is repeated for the modem/radio firmware, which is essential if you intend to use the device for cellular communications. The file responsible for this is NON-HLOS.bin, where NON-HLOS stands for Non High Level Operating System. The remaining partitions — boot, OEM and logo — are then flashed sequentially, without the need for a reboot between them.
1
2
3
4
5
6
7
8
9
fastboot flash system system.img_sparsechunk.0
fastboot flash system system.img_sparsechunk.1
fastboot flash system system.img_sparsechunk.2
fastboot flash system system.img_sparsechunk.3
fastboot flash system system.img_sparsechunk.4
fastboot flash system system.img_sparsechunk.5
fastboot flash system system.img_sparsechunk.6
fastboot flash system system.img_sparsechunk.7
fastboot flash system system.img_sparsechunk.8
We then flash the system partition, which is divided into 9 separate chunks. This is necessary because the full system image exceeds the maximum single transfer size that fastboot allows, so it must be flashed sequentially in smaller pieces — better safe than sorry.
1
2
3
4
5


fastboot erase userdata
fastboot erase cache
fastboot reboot
Finally, we wipe the userdata and cache partitions to ensure a clean slate with the newly flashed firmware, then reboot the device.
Wait for the phone to boot into Android 8.1. Verify at Settings > About Phone. Then re-enable USB Debugging.
7) Flash TWRP Again
The firmware flash overwrites recovery. Flash TWRP again:
1
2
3
adb reboot bootloader
fastboot flash recovery twrp-3.5.2_9-0-cedric.img
fastboot reboot
Immediately hold Volume Down + Power and select Recovery to boot into TWRP.
8) Download LineageOS 18.1
Download the LineageOS 18.1 nightly for cedric from the Internet Archive:
1
https://archive.org/download/lineage-18.1-20240306-nightly-signed_20240310_1104/Motorola/Motorola%20-%20moto%20g5%20-%20cedric/
Download the file: lineage-18.1-20240306-nightly-cedric-signed.zip
Do not extract the zip. Keep it as-is.
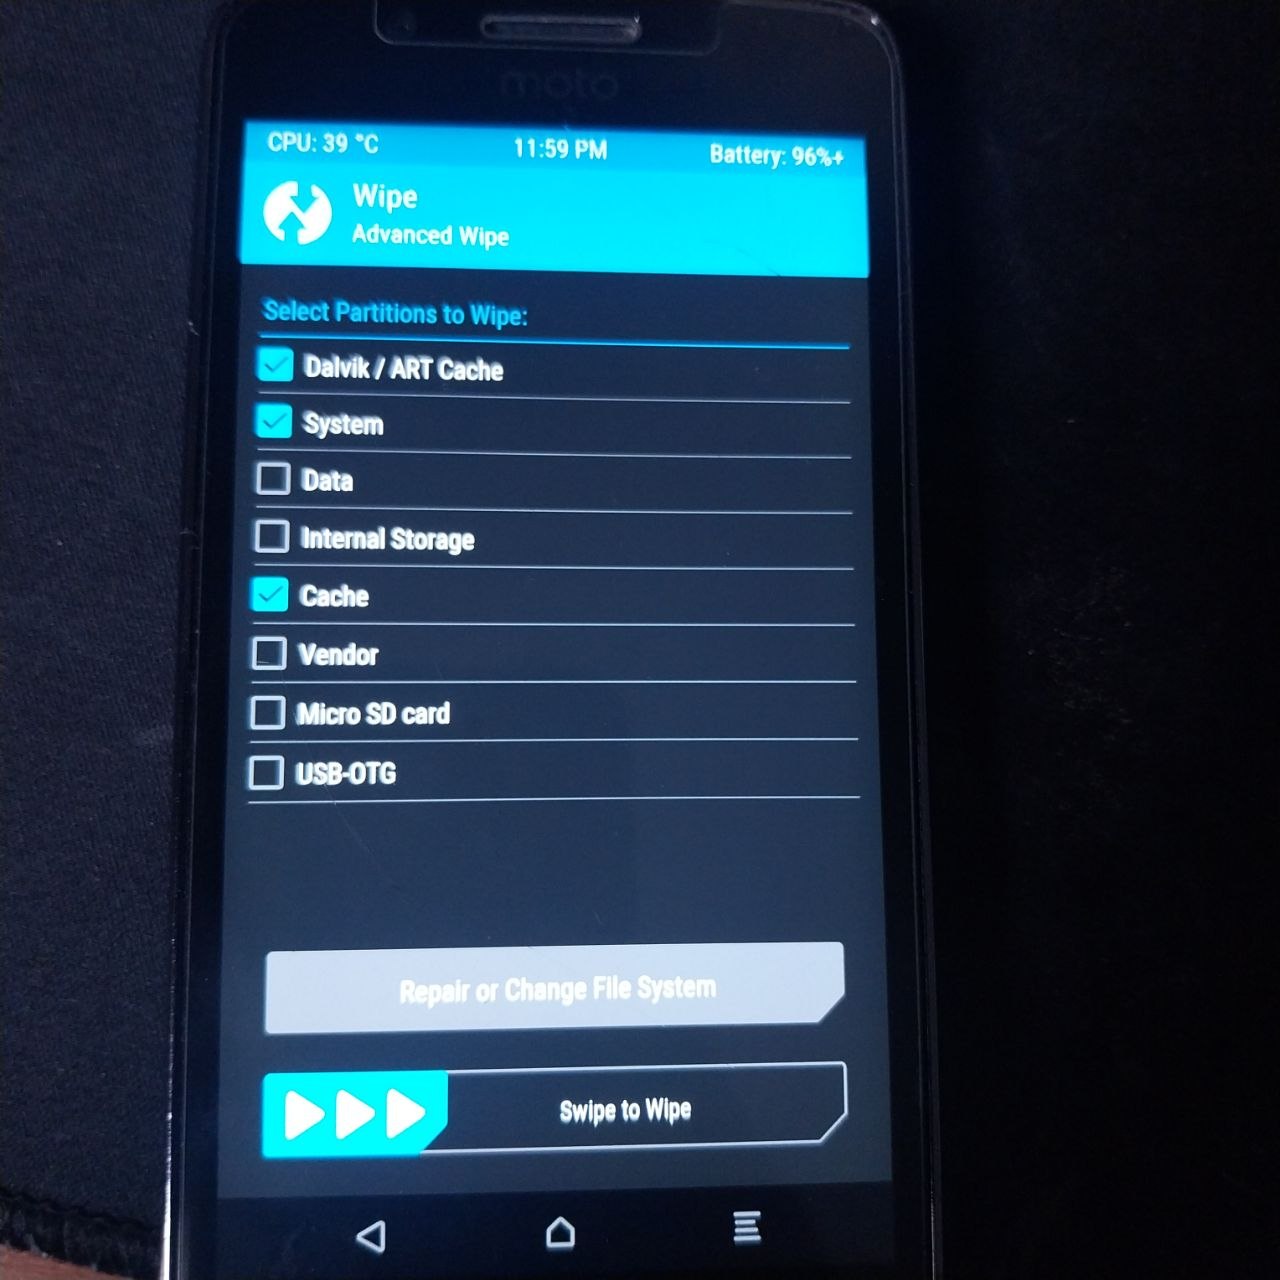
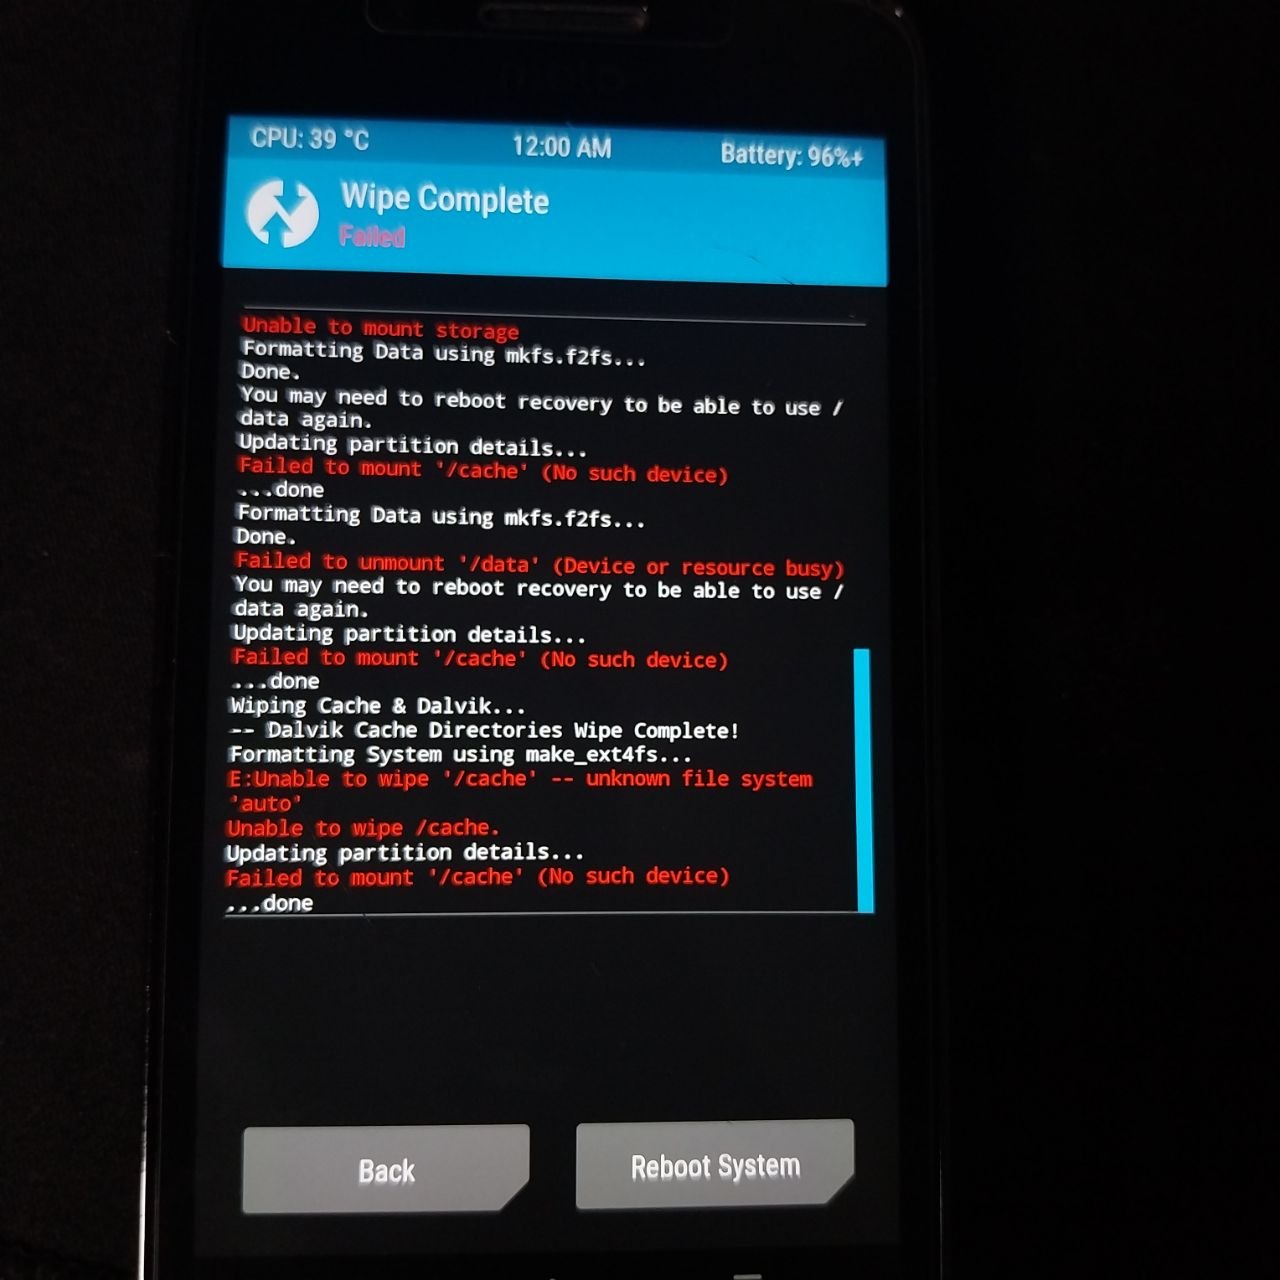
9) Wipe and Sideload LineageOS in TWRP
In TWRP:
- Tap Wipe > Format Data → type
yes→ confirm (this removes encryption)
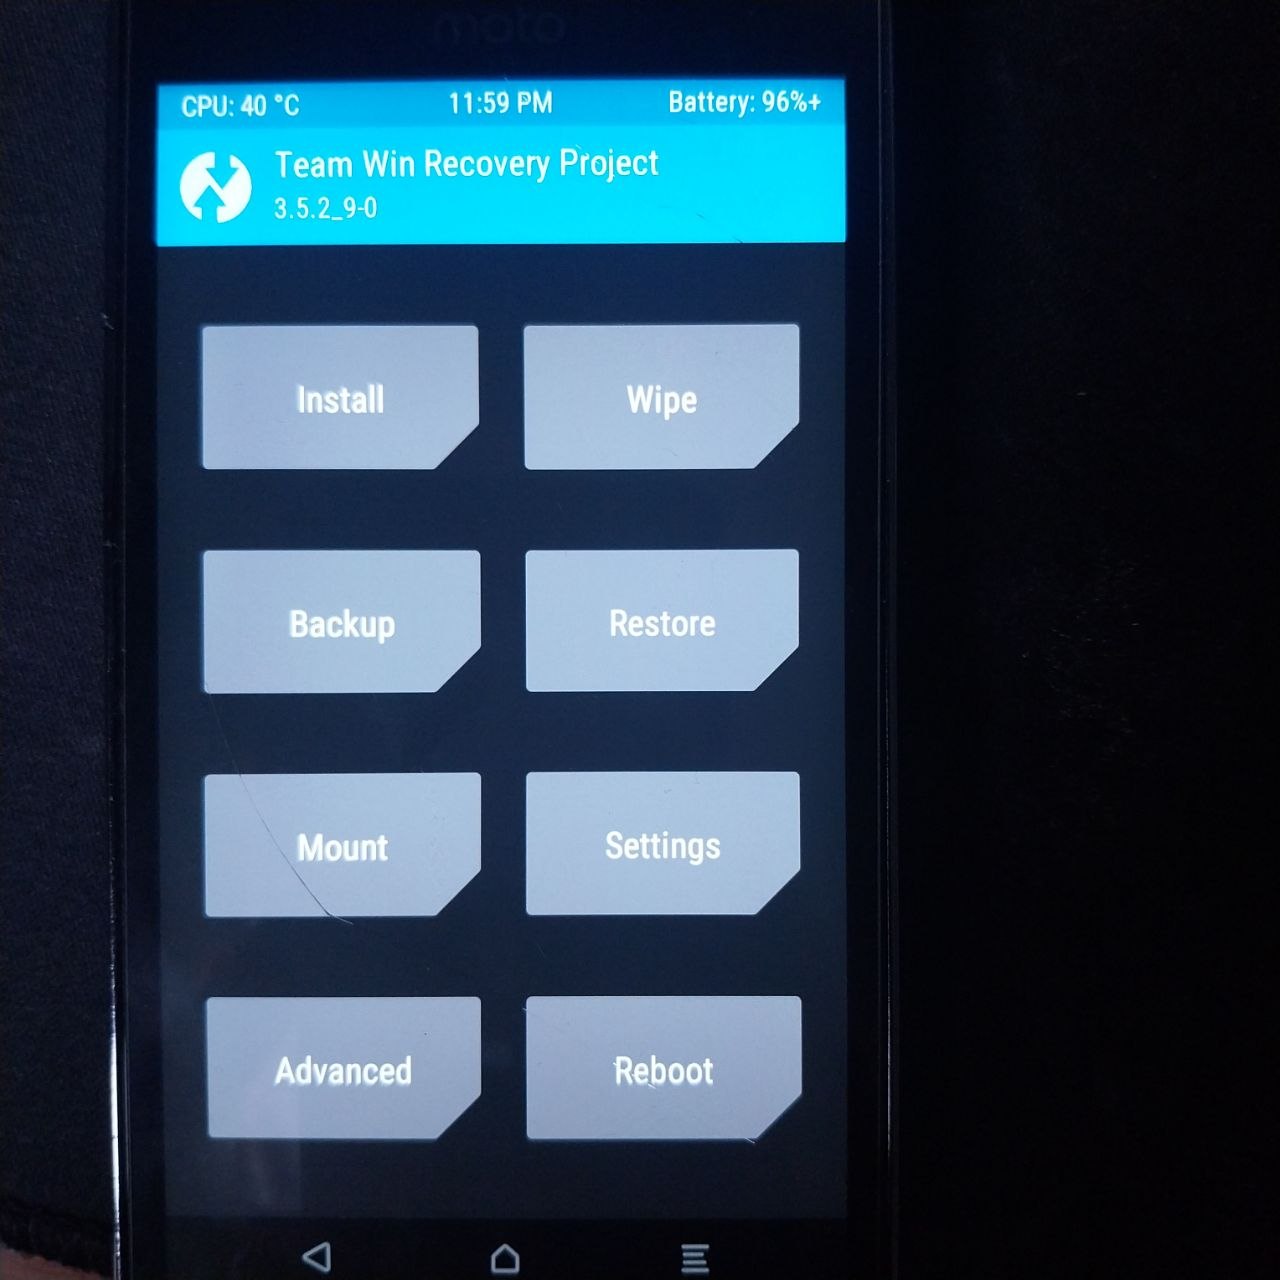
- Tap Wipe > Advanced Wipe → check Dalvik, Cache, System → swipe to wipe
- Tap Advanced > ADB Sideload → swipe to start
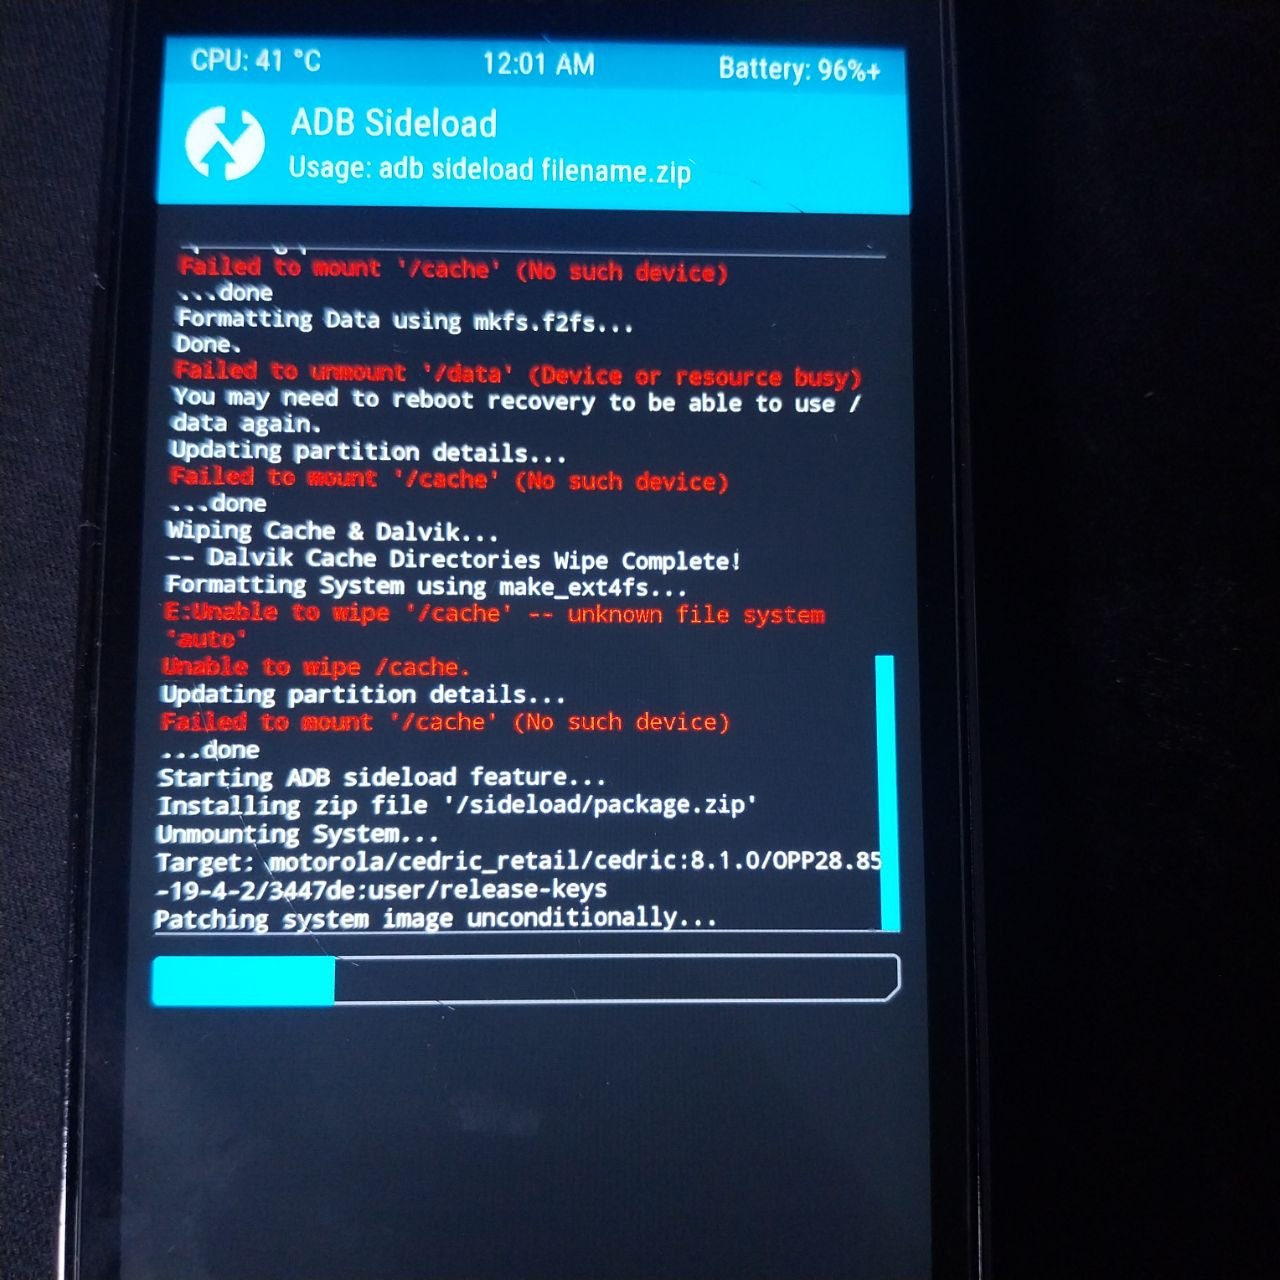
Then on your PC:
1
adb sideload ~/Downloads/lineage-18.1-20240306-nightly-cedric-signed.zip
Wait for it to complete. You’ll see Total xfer: 1.02x when done. The error E: unable to wipe /cache - unknown file system auto is harmless — ignore it.
10) Fix the Boot Loop (Replace TWRP with LineageOS Recovery)
After sideloading, TWRP will keep intercepting the boot and looping back to itself. Fix this by replacing TWRP with the stock recovery, then booting into LineageOS recovery:
In TWRP tap Reboot > Bootloader, then:
1
2
3
# Flash the stock recovery (from the firmware package downloaded earlier)
fastboot flash recovery ~/Downloads/g5/recovery.img
fastboot reboot
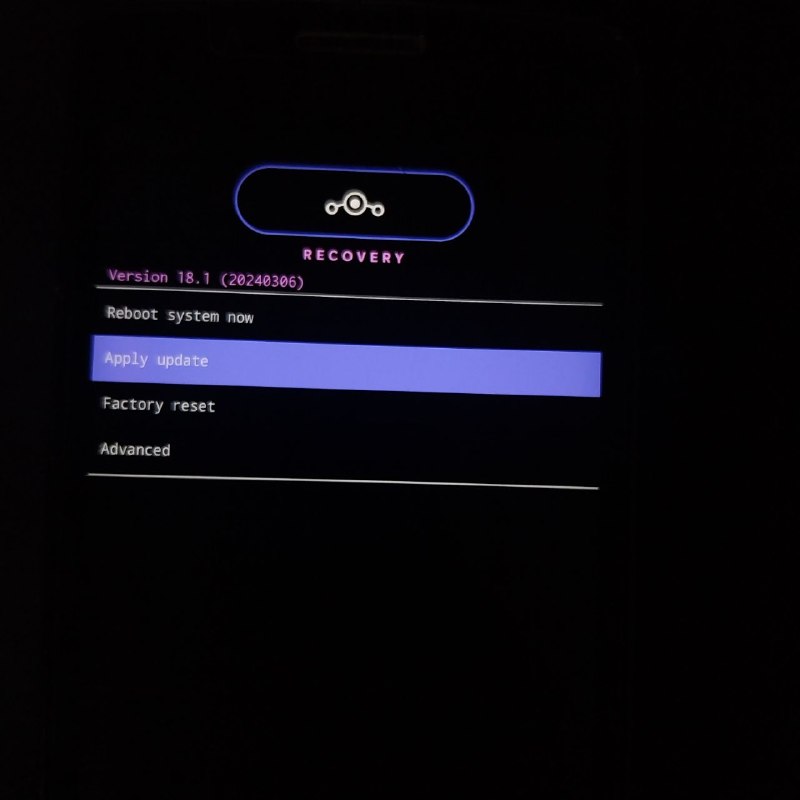
Immediately hold Volume Down + Power → select Recovery. This time it boots into LineageOS recovery (black screen with white text) instead of TWRP.
In LineageOS recovery, select “Reboot system now” and press Power.
If it loops back to recovery, go to the bootloader screen and select Start to boot normally.
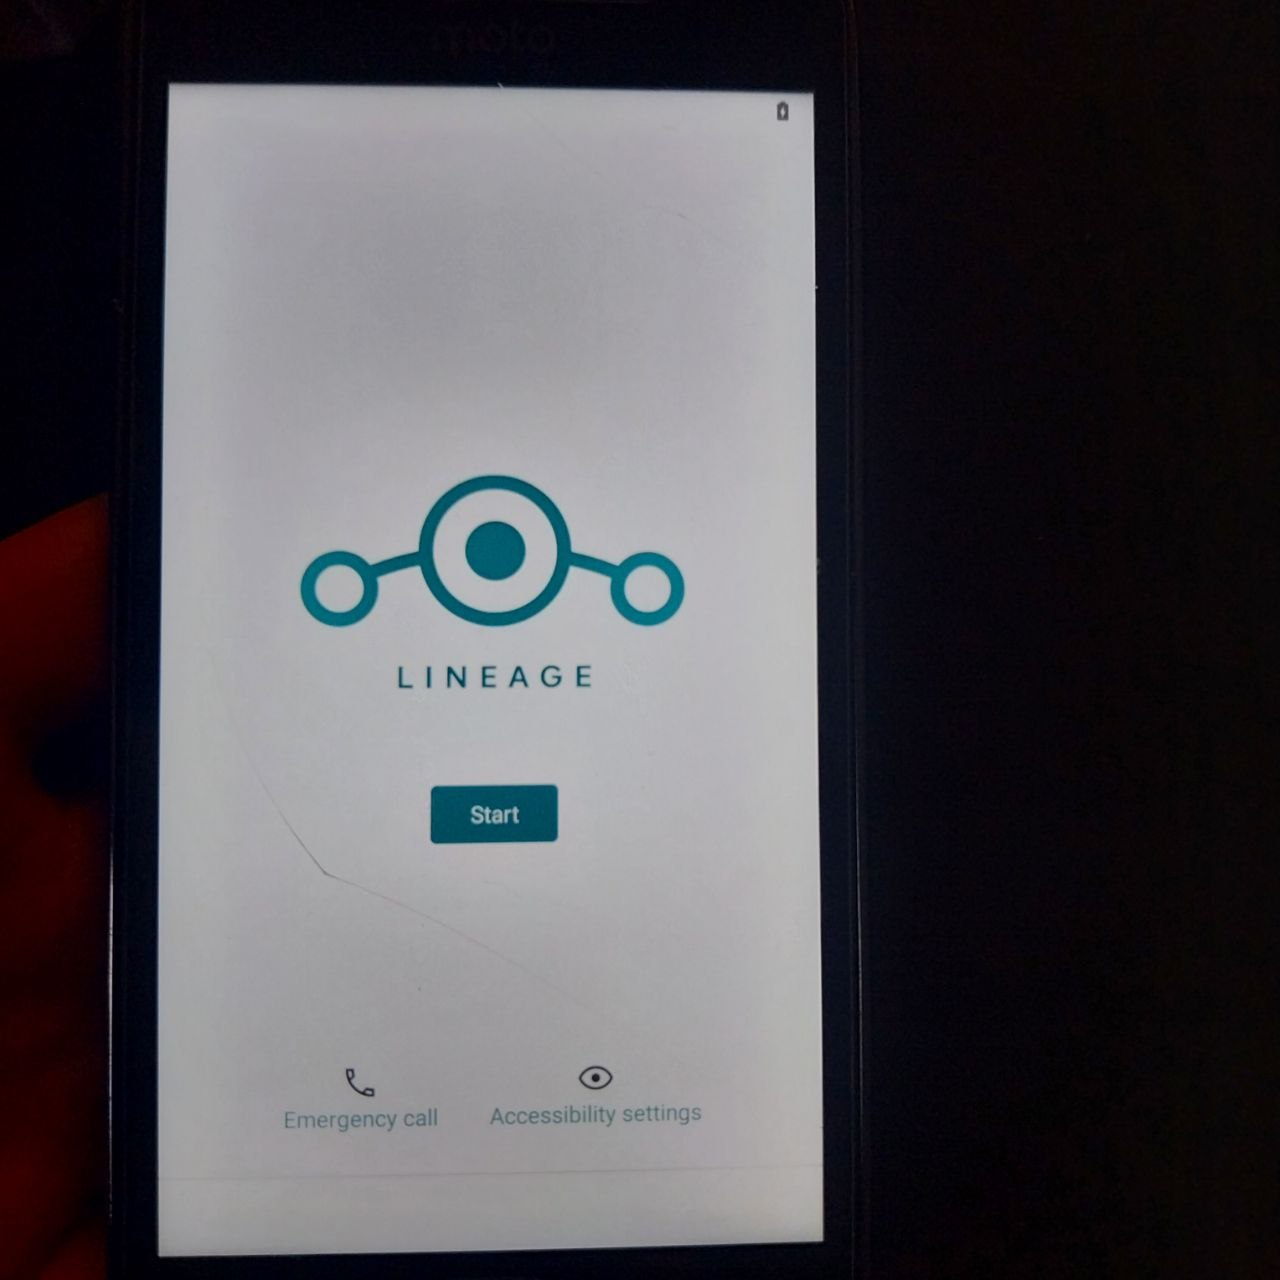
11) First Boot
The first boot takes 5–10 minutes. Leave the phone on the LineageOS logo and don’t touch it.
If the screen goes black but a small LED light stays on in the top left corner — that’s normal, the phone is still booting. Press Power once to check if the setup wizard appears.
If it loops back to recovery, go to the bootloader screen and select Start to boot normally.
12) Install Magisk (Root)
LineageOS does not come rooted by default. Root requires Magisk to be properly installed by patching the boot image.
12.1) Download Magisk
Download the latest Magisk APK from GitHub:
1
https://github.com/topjohnwu/Magisk/releases
Install it as a normal app:
1
adb install ~/Downloads/Magisk-v27.0.apk
12.2) Patch the Boot Image
Push the LineageOS boot image to the phone:
1
adb push ~/Downloads/lineage-boot/boot.img /sdcard/
Then in the Magisk app on the phone:
- Tap Install next to “Magisk”
- Select “Select and Patch a File”
- Navigate to
/sdcard/boot.img - Tap it — Magisk will patch it and save as
magisk_patched_XXXXX.imgin/sdcard/Download/
12.3) Find and pull the patched image
First find the exact filename:
1
adb shell ls /sdcard/Download/
Then pull it using the exact name:
1
adb pull /sdcard/Download/magisk_patched_XXXXX.img ~/Downloads/
12.4)Flash the patched boot image
1
2
3
adb reboot bootloader
fastboot flash boot ~/Downloads/magisk_patched_XXXXX.img
fastboot reboot
Note: This only replaces the boot partition. Your LineageOS installation, apps and data are not affected.
12.5) Verify root
Open the Magisk app — it should now show a version number next to “Magisk” instead of N/A. Zygisk can be enabled in Magisk settings.
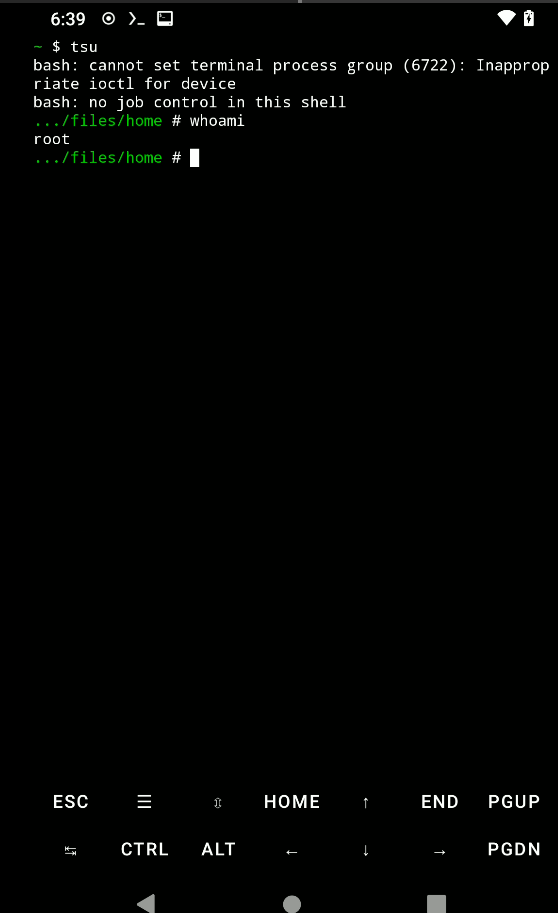
To test root in Termux:
1
2
pkg install tsu
tsu
13) Install Kali NetHunter (Optional)
NetHunter turns your phone into a portable penetration testing device with full Kali Linux tools.
13.1) Add NetHunter repo to F-Droid
In F-Droid → Settings → Repositories → add:
1
https://store.nethunter.com/repo
Install Kali NetHunter (the full app) from F-Droid.
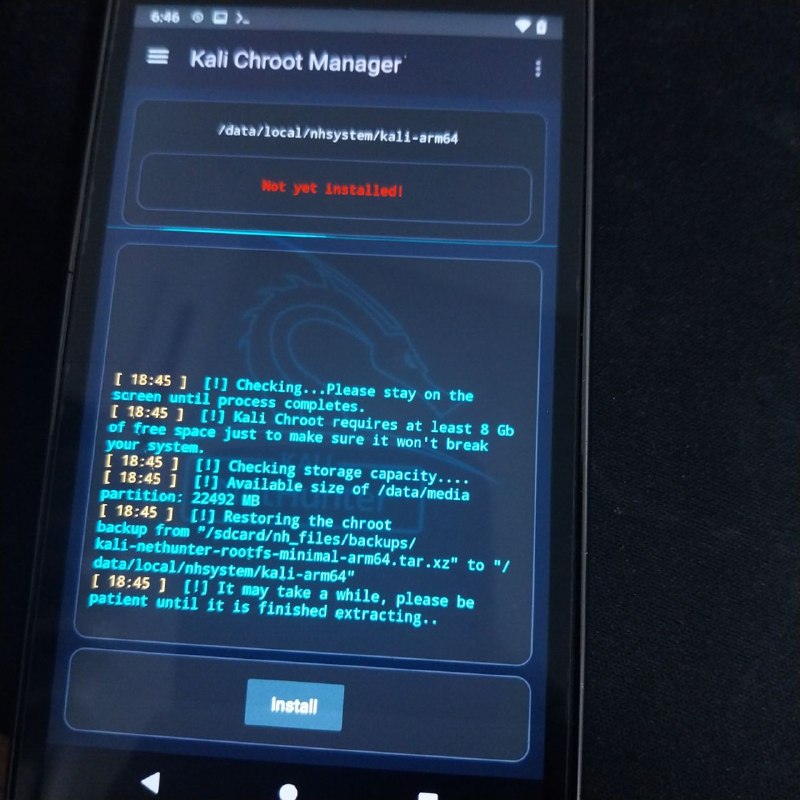
13.2) Install the Kali chroot
- Open the NetHunter app
- Go to Kali Chroot Manager
- Tap Install Kali Chroot
- Select Minimal (recommended for 32GB storage) — about 200MB
- Wait for the download and installation to finish (10-20 minutes, use WiFi)
13.3) Access the Kali shell
Open NetHunter Terminal and select Kali from the shell dropdown. You now have a full Kali Linux environment on your phone.
Install tools as needed:
1
2
apt update && apt upgrade
apt install nmap sqlmap metasploit-framework wireshark
Note: Root (Magisk) must be properly installed before NetHunter shell will work.

Troubleshooting
“Preflash validation failed” when flashing recovery
This happens when the bootloader is still locked. Make sure fastboot getvar securestate returns oem_unlocked before flashing anything.
“Image not signed or corrupt” when flashing recovery
This is normal on unlocked Motorola devices and means success.
Phone not detected by fastboot
- Try a different USB port (prefer USB 2.0 over USB 3.0)
- Try
sudo fastboot devices - Add udev rules:
1
2
echo 'SUBSYSTEM=="usb", ATTR{idVendor}=="22b8", MODE="0666", GROUP="plugdev"' | sudo tee /etc/udev/rules.d/51-android.rules
sudo udevadm control --reload-rules && sudo udevadm trigger
This package requires firmware from an Android 8.1 based stock ROM
You’re still on Android 7. Follow Step 6 to flash the stock 8.1 firmware first.
TWRP keeps intercepting the boot
Replace TWRP with the stock recovery as described in Step 10. LineageOS recovery will let the system boot normally.
Phone stuck on “No command” screen
Hold Power + Volume Up briefly to open the recovery menu. Select “Reboot system now”.
Phone not detected at all (possible soft brick)
Hold Volume Down + Volume Up + Power simultaneously for 10 seconds to enter EDL (Emergency Download Mode). Run lsusb | grep -i qualcomm — if you see QDLoader 9008, the phone is recoverable.